
Re-Assembling the Valve Train
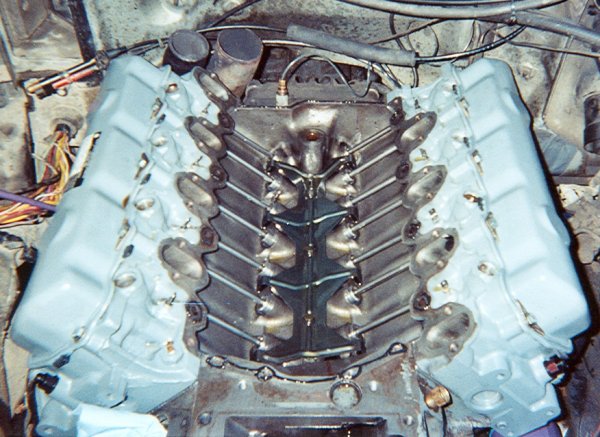
With the heads fully torqued to 90 ft-lbs in 8 steps (yes, I'm anal ;) ), it's time to start putting the valvetrain back together. You can see here new lifters installed all along the driver's side of the engine, and all but three on the passenger's side. This engine utilizes hydraulic "roller"-type lifters, and as such they're not meant to be able to rotate. A simple lock serves to keep the lifters oriented so that the roller is in proper contact with the camshaft lobe at all times. One lock works with two lifters, with two arms going around each lifter and keeping them set in place while allowing them to go up and down. You can see these locks on every lifter but the rearmost on the passenger's side.

A thin metal retainer keeps these locks from coming off, seen in the center almost completely covering the valley. You can also see here three completed valvetrain sets, with the pushrods coming up from a fourth, ready for the rocker arm assembly to be installed.
All 8 valvetrain sets are installed, along with the valve covers. She's starting to look more and more like an engine each day! You can also see the two exhaust pipes routed up to the turbo. The one on the right connects the exhaust manifolds to the turbo, with exhaust exiting the turbo through the pipe on the left. I got lucky; the exhaust "downpipe" with this ATS setup is 3 inches; many people wind up with a 2 1/2" downpipe. I've also removed the tape covering the intake ports on the head, along with RTV'ing the front and rear of the block, preparatory to installing the "valley pan" and the intake manifold.
Removing external parts and accessories
Heads, gaskets, and the block after head removal
Removing timing gear cover and camshaft
Cleaning the ins and outs of the engine
Final engine block cleaning with compresed air
Assembling and testing the oil cooler
First steps of modifications for the turbocharger
Comparing the stock head bolts to ARP studs (lengthy!)
Installing the valvetrain
Installing the intake manifold and injector pump
Assembling and installing the turbocharger