Assembling and Testing the Oil Cooler
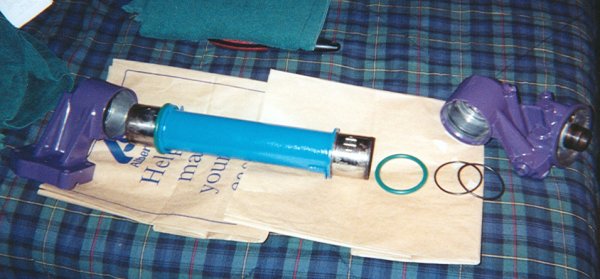
After painting the oil cooler pieces, acquiring the correct O-rings, waiting for a pressure tester, and waiting to recover from oral surgery, I'm finally ready to put the oil cooler back together. On the left side, all three O-rings are in their proper locations (you can't see the two smaller O-rings that are in the header). On the right, you can see the order in which everything goes in.
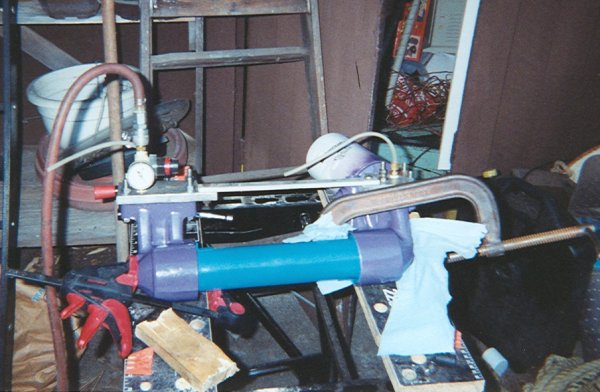
The oil cooler being tested. Not having the proper-size clamps, I used two smaller C-clamps (arranged in a haphazard manner that, amazingly enough, worked) to keep the end caps from popping off. This was strengthened by a bar connecting the two plates that make up part of the tester. The tester works by pumping air pressure into the oil side of the cooler, with the other end of the oil side blocked off. There are two hoses at each end of the coolant passages, and the goal is to not hear or feel any air escaping out of these hoses. The air pressure goes through a regulator so that you can set the pressure. As my oil pressure never goes above 60 psi, I carefully brought the pressure up to that level and held it for a couple of minutes, and pressure held properly. This means that the oil cooler O-rings are in good condition, and it's safe to mount the oil cooler onto the engine.
Special thanks again to Bill Miller for shipping out the oil cooler tester that he built himself, for me to use as long as needed, for only the cost of shipping. The peace-of-mind is well-worth it.
Removing external parts and accessories
Heads, gaskets, and the block after head removal
Removing timing gear cover and camshaft
Cleaning the ins and outs of the engine
Final engine block cleaning with compresed air
Assembling and testing the oil cooler
First steps of modifications for the turbocharger
Comparing the stock head bolts to ARP studs (lengthy!)
Installing the intake manifold and injector pump
Assembling and installing the turbocharger