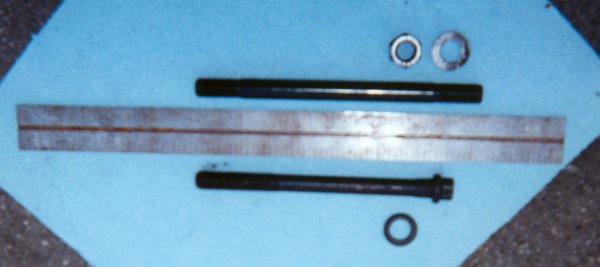
Factory head bolts as compared to ARP studs
After finding out that International-Harvester wanted $8 per head bolt and that Ford wanted a similar price, I wanted another option. I'm a college student, and $430 for bolts is a lot of money to me. :) After talking things out with felow boardmembers on TheDieselStop, it didn't appear that there were any less expensive bolt options out there that weren't of questionable quality. I had initially wanted to replace the bolts with studs (given that the 6.9l engine has a problem with head gaskets, I did not want to reuse the old bolts, especially since I'm adding a turbocharger), but the general consensus was that studs could not be properly installed unless the engine was removed from the truck. Re-opening the discussion, a group of people came up with a way that the studs could be installed with the engine in the truck, and even a way to remove them. Considering that Automotive Racing Products was selling a complete stud kit (part number 150-4069 as of February 2006) for $230, upon finding a way to install them without pulling the engine, this question became a no-brainer.
You can see one of the factory head bolts here on the bottom, along with one stud acquired from ARP and the assorted hardware (washers, and a nut for the stud). I had hoped that the camera would get the gradation marks on the ruler that's placed in between the two, but it did not work out this way.
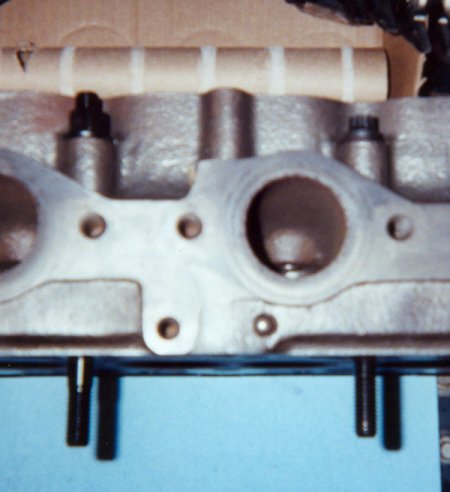
Here, the stud and the bolt are placed in adjacent bolt holes in a "spare" cylinder head that my buddy Seth used to practice the head job with. Prior to taking this picture, I had taken the bolt and the stud, threaded them into the engine block as far as they could go (after chasing the threads in each hole multiple times with a bottoming tap), and used masking tape to mark the maximum depth that the two would get to. In this picture, the nut on the stud was threaded to the point where it would be in contact with the head surface (with the washer in place) right at the point where the masking tape mark cleared the head mating surface. The bolt is in as far as it will go.
The stock head bolt, when threaded in all the way, has 1 5/8" of its length threaded into the engine block, with 3 5/8" protruding from the deck surface, making for a total length of 5 1/4". However, were the bolt also going through the head, there would be 5/16" of additional travel that the bolt could go into the head.
The ARP stud, on the other hand, can thread as much as 1 7/16" into the engine block, leaving 4 11/16" protruding from the deck surface, making for a total length of 6 1/8". The stud goes a full 1/8" deeper into the block than the factory head bolt would thread in with the head in place, and with the stud at this depth, the nut can thread all the way to the point where the washer makes contact with the head surface, with an extra 3/16" to spare.
This means that, although it might appear that the factory bolt goes in deeper, in reality, the stud will go deeper into the engine block, allowing for extra strength. This is on top of the natural extra clamping force that a stud/nut combination will have over a bolt (I do not have exact numbers on this, unfortunately).
I didn't have the chance to see this data before ordering my stud kit, but if I had, that would have further reinforced my decision to replace the factory bolts with studs. I would recommend that anyone who's doing a head gasket job on a 6.9l consider upgrading to studs if at all possible. The 6.9l has issues with the head fasteners not clamping the heads down as much as they should, potentially resulting in gasket leaks. The studs should minimize this.
Lastly, I should mention the method of which I torqued the heads. I used a Snap-On torque wrench that literally had never been removed from its box before this job. The factory shop manual calls for the factory bolts to be torqued in 4 sequences. First, the bolts are to be torqued to 40 ft-lbs, following a numbered sequence that basically goes from the center of the head outward. Second, the bolts are to be torqued to 65 ft-lbs in the same pattern. Third, the bolts should go to 75 ft-lbs in a line sequence starting at the top and going down (top row, second row, bottom row). Fourth, the bolts should be re-torqued to 75 ft-lbs in the same pattern. This conflicted with both the instructions given to me by ARP and the instructions given to me by ATS. ARP's literature says to follow the factory guidelines, but to instead torque to 85 ft-lbs if using engine oil as a thread lubricant. ATS's literature says to add 10 ft-lbs to what would have been done already.
Confused, I called ARP and spoke with a technical representative, and it was suggested that I compromise between ARP's and ATS's instructions and torque to a final reading of 90 ft-lbs. I did this in 8 total steps, following the four listed above, then torquing to 85 ft-lbs in the line sequence, re-torquing to 85 ft-lbs in the line sequence, then going up to 90 in the line sequence, followed finally by 90 ft-lbs again in the line sequence. Nothing broke, and I don't think it's possible to put too much force on the head gaskets, so I should be good to go indefnitely now. *fingers crossed*
Removing external parts and accessories
Heads, gaskets, and the block after head removal
Removing timing gear cover and camshaft
Cleaning the ins and outs of the engine
Final engine block cleaning with compresed air
Assembling and testing the oil cooler
First steps of modifications for the turbocharger
Comparing the stock head bolts to ARP studs (lengthy!)
Installing the intake manifold and injector pump
Assembling and installing the turbocharger